
ExamDiff Pro 5.5: Automated Directory Synchronization |
The biggest new feature in the next version of ExamDiff Pro is the Automated Directory Synchronization feature, which allows you to automatically synchronize two directories that are being compared. Automated synchronization is a faster alternative to manually selecting the files to copy, and remains safe due to its Preview feature and detailed logging.
Let me show you how automated synchronization works:
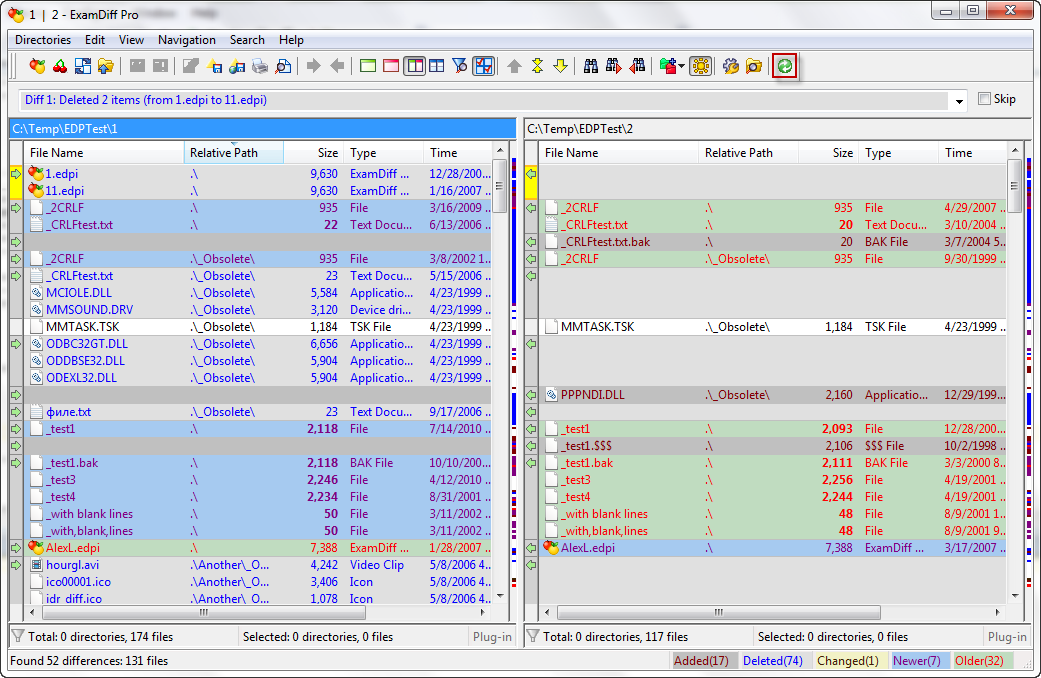
Suppose I'm comparing two directories, and I wish to synchronize in the left-to-right direction (in other words, copy new and changed files from the left directory to the right directory). I open the Synchronize Directories window by either going to Edit | Synchronize Directories ... or clicking the toolbar button as shown below:

The Synchronize Directories window, shown below, presents you with a list of options, but don't worry: the options are all simple, and the default configuration is most likely what you want.

First, you need to choose in the drop-down box which direction the synchronization should occur in. The First -> Second and Second -> First modes copy files and directories in only one direction, useful in backup operations. Meanwhile, the Bidirectional mode copies files and directories in both directions, useful when you want the two directories to mirror each other.
The remaining options control how the synchronization occurs. You can choose which of the three possibly synchronization operations (copy new files, copy empty directories, replace existing files) to perform, and can choose how to replace files (if Only if newer is checked, only files that are newer are copied; otherwise, all changed files are copied). The Use directory comparison filters option specifies whether filtered files/directories should be copied as well, and Re-scan directories before synchronizing is useful if some files may have changed since comparison occurred. Note that re-scanning is enforced in two situations: if comparison was non-recursive or if filters were used for comparison but won't be used for synchronization.
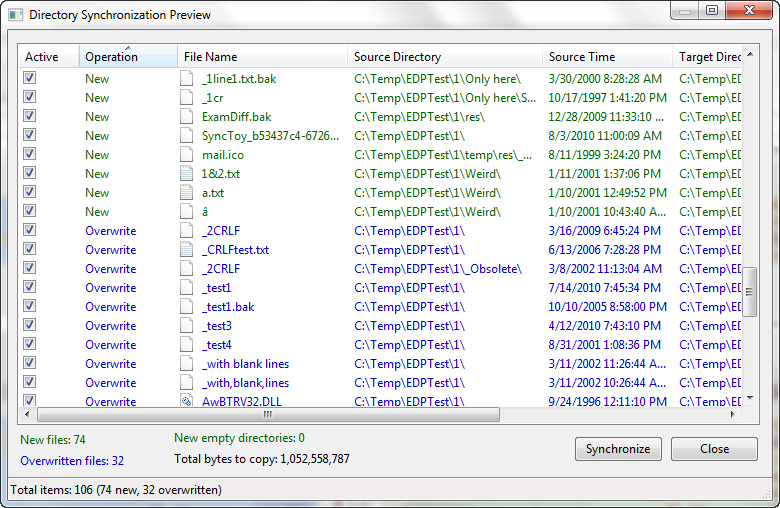
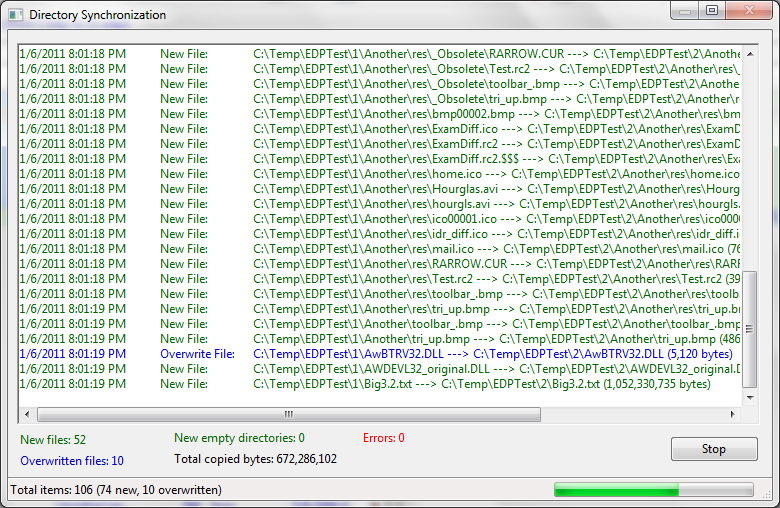
Clicking the Preview button takes you to the Directory Synchronization Preview dialog (shown below), which shows you the operations that will be overtaken and the total number of bytes that will be copied, as well as letting you select specific files/directories to copy or not copy using the checkboxes on the left. (Clicking the Synchronize button in the previous dialog will skip this step.)

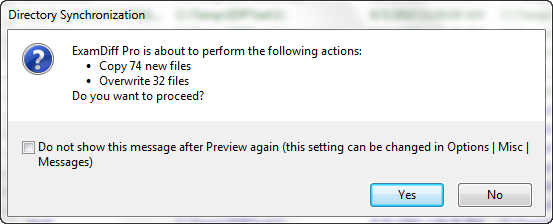
After you click Synchronize, you will receive one final message about the operations that will occur as part of synchronization:

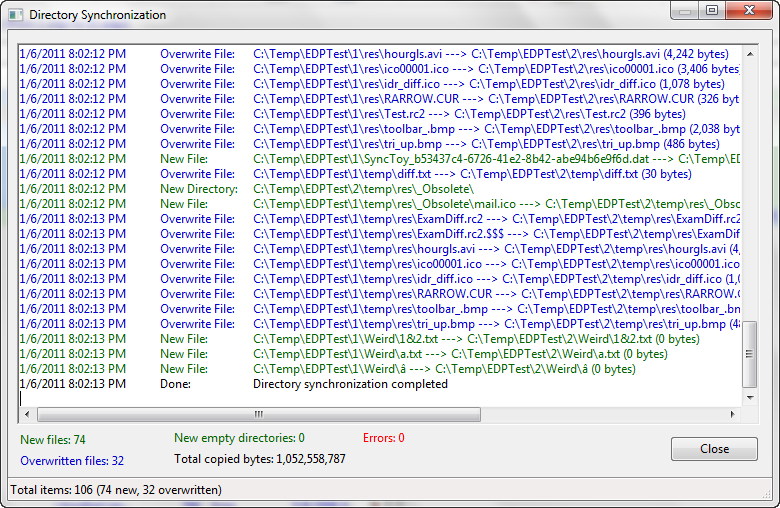
Click OK, and synchronization will start, and a dialog similar to the Preview dialog is opened.

As files are copied, the dialog is updated with the results of each operation, finally displaying Done: Directory synchronization complete when all files are copied.

When synchronization finishes, I can click Close and immediately observe the effects. Note that re-comparison is required if the directories were re-scanned prior to synchronization.

Let me show you how automated synchronization works:
Suppose I'm comparing two directories, and I wish to synchronize in the left-to-right direction (in other words, copy new and changed files from the left directory to the right directory). I open the Synchronize Directories window by either going to Edit | Synchronize Directories ... or clicking the toolbar button as shown below:
The Synchronize Directories window, shown below, presents you with a list of options, but don't worry: the options are all simple, and the default configuration is most likely what you want.
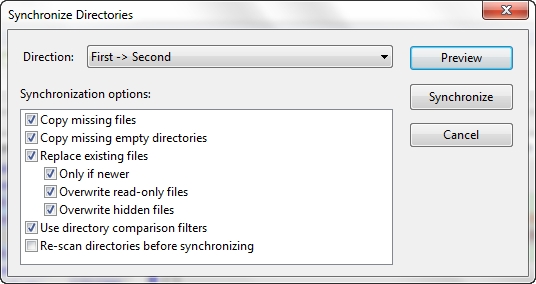
First, you need to choose in the drop-down box which direction the synchronization should occur in. The First -> Second and Second -> First modes copy files and directories in only one direction, useful in backup operations. Meanwhile, the Bidirectional mode copies files and directories in both directions, useful when you want the two directories to mirror each other.
The remaining options control how the synchronization occurs. You can choose which of the three possibly synchronization operations (copy new files, copy empty directories, replace existing files) to perform, and can choose how to replace files (if Only if newer is checked, only files that are newer are copied; otherwise, all changed files are copied). The Use directory comparison filters option specifies whether filtered files/directories should be copied as well, and Re-scan directories before synchronizing is useful if some files may have changed since comparison occurred. Note that re-scanning is enforced in two situations: if comparison was non-recursive or if filters were used for comparison but won't be used for synchronization.
Clicking the Preview button takes you to the Directory Synchronization Preview dialog (shown below), which shows you the operations that will be overtaken and the total number of bytes that will be copied, as well as letting you select specific files/directories to copy or not copy using the checkboxes on the left. (Clicking the Synchronize button in the previous dialog will skip this step.)
After you click Synchronize, you will receive one final message about the operations that will occur as part of synchronization:
Click OK, and synchronization will start, and a dialog similar to the Preview dialog is opened.
As files are copied, the dialog is updated with the results of each operation, finally displaying Done: Directory synchronization complete when all files are copied.
When synchronization finishes, I can click Close and immediately observe the effects. Note that re-comparison is required if the directories were re-scanned prior to synchronization.
Labels: ExamDiff Pro, Features

0 Comments:
Post a Comment
<< Home